I spent some time thinking about what my January project should be. I had been thinking about some sort of asteroids+bullet hell with power-ups, and a friend suggested maybe pinball or a Marble Madness-type game. I don’t really know enough about pinball to design a fun layout, and I think the physics of such narrow spaces and precise hit areas might be too finicky to get right in a month.
Marble Madness could work, although it would probably be a single level at best in the time frame I have. This could be an interesting project because it would be a 3D project, but without all the modeling and art requirements of most 3D titles. I am going to spend some time prototyping movement controls for this game, and see if it inspires me.
I spent about an hour and a half working on a tech demo of a marble racing game. I installed Blender, and without having any clue how to use it I tried to make a platform for a proof of concept level.


The above screenshots show what I accomplished in an hour. Actually loading that “level” into the Unity game was a disaster, however. The marble would fall halfway into the ground, and at some points fall through completely. I’m sure this is due to a combination of not knowing how to configure the physics, and the mesh itself probably being horribly disfigured since I don’t know how to do 3D modelling. I’m out of time for today, but I’ll see if I can work on this some more in order to decide on a project before January.
Time to get the Ball Rolling (December 31)
Day two of prototyping a “marble racer” game to see if it seemed viable to make one in January. After learning yesterday that creating a whole level as a big model in Blender was really hard, I decided to try something different: copying and pasting a bunch of stretched cubes to make a level. It seems like this would be a good way to get some reuse from the prefab concept, and some initial research leads me to believe Unity might even be designed for creating levels right within the editor. Since I don’t know how to “join” adjacent meshes, I have some concerns that there will be a lot of unnecessary geometry. Whether this causes an issues (poor performance, physics issues, etc.) remains to be seen and is part of why I am testing this method today.
Components
I’ve decided this game will use a uniform three-dimensional grid, with each cell being one unit long on each side. The most basic component used to construct my level map is a rectangular prism with dimensions of (1, 5, 1). In other words, the top of this piece is a 1×1 flat region, and it is essentially a five unit tall pillar.
The height of five is meant to be arbitrarily high, so that the bottom of the terrain extends past the edge of what the camera will see. I suspect this number will need to eventually be set much higher.
I can then replicate this single tile to create more complex building blocks, as shown below.


These building blocks could be combined to form a really simple “level”, and from there I was able to add a basic control script and some physics.

I consider this enough of a success to move forward with this game concept for January. Early on in the project I will need to figure out the following items though:
- How to set good camera angles, and follow the ball’s movement with the camera
- Texture and lighting so that the level looks better
- Ramps and elevation differences in the level
New Month, New Project (January 1)
After having completed enough of a proof-of-concept to green light High Roller as my January project, I officially created the empty Unity project and setup the GitHub project. I like to configure my projects using the Probot Settings App, which lets me specify a lot of repository settings (description, tags, branch protection rules, issue labels, etc.) via a configuration file. This makes it easier to setup all of my repositories the same way. You can see the settings for the High Roller repository in its settings.yml file.
On the Shoulders of Giants (January 2)
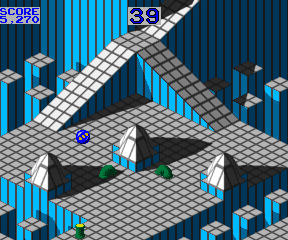
If at the end of this project people consider it good enough to call it a “Marble Madness Clone,” then I will consider that a huge success. Odds are it won’t be good enough to earn that distinction. To get as close to that classic arcade game as I can, however, I spent some time today watching game play videos of Marble Madness on several platforms. The goal of this exercise was to figure out the types of terrain elements I want to include in High Roller.
Like anyone who’s played the game, I have clear memories of the narrow ledges and infinite pits that can devour our spherical protagonist. One thing that I had forgotten—but which is clearly an important element of the challenge—is just how bouncy the marble is. Walls in that game don’t just guide you through a path, they are in a very real way a deterrent to rapidly making your way through levels. The following clip illustrates what I mean:

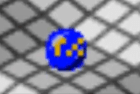
A characteristic of Marble Madness is the precise geometry of its levels. With the textures being, for the most part, a simple grid pattern it is easy to get a sense of scale and analyze the size of pathways and other terrain features, the elevation change from ramps, etc. To start with, I confirmed that the player’s marble is basically the same size as one grid tile, as shown in the image to the right.
Then I just took a bunch of screenshots of some different types of terrain elements, which I will use as inspiration when designing my own levels for High Roller. A sampling of these is included below.


And, of course, I grabbed one of the part of the game I remember absolutely hating as a child. In fact, this little wavy ramp section is pretty much the only part of the game I actually remembered clearly until I started this research. I think it’s likely that, in my youth, I never actually made it past this section of the game.

Map Size and Performance (January 2)

The source code for the performance test of a vertical level can be found on the spike/cube-based-level-performance branch of the project’s GitHub repository.
Since what I perceive to be the simplest way to build the levels—manually placing objects in the Unity editor—is very clearly not optimized, I’m concerned about performance. As a result, I want to create a prototype at the start of the project to verify that this approach will work. I’ve decided to programmatically build a map with 5000 map tiles and verify that it performs adequately. I came up with this number by making the following observations about the Marble Madness maps:
- All the maps are the same width, and so the left-to-right movement is very constrained
- Level one is the shortest level, level two is the longest
- Rough napkin math indicates the maps are between ~2500 and ~5000 tiles each
The following (low quality) animation shows the performance of panning around a map with a shape similar to the levels I will be creating. The map is a region 32 tiles by 160 tiles, that is on a generally downward slope. With default lighting this was smooth enough to meet the goals of this project.

As a rough gauge of how much performance headroom this would leave, I performed another test where I panned around a flat region containing 3x as many tiles and with much more height variance between them. This resulted in a noticeable and unacceptable drop in frame rate. Nevertheless, I believe I can get the needed performance given the size of maps I intend to build. This is especially true since this project will not target mobile platforms. This test confirms, however, that this would not be the correct way to build a game like Minecraft.

After this test, I feel confident that I could build the maps by manually composing a lot of prefabs. The prefabs would be some combination of default Unity cubes and models built in Blender (for ramps and the like). Alternatively, I might need prefabs that dynamically build some of their geometry at runtime to get the seamless mesh and variety of intersecting angles in the original game’s maps.
That said, I am going to also explore the use of ProBuilder before committing to this method. I’ve been doing some investigation (by watching videos such as this one on building levels with ProBuilder), and think this might allow me to more easily craft levels with much more optimized meshes. I am going to do a proof of concept with this tool next, and then make a final determination on how to proceed.
Using ProBuilder like a Pro (January 3)
The source code for the ProBuilder-based prototype can be found in the project’s GitHub repository.
Following up on the test of a purely cube-based map, I created prototype levels using two additional methods: the builtin “Terrain” object type in Unity, and ProBuilder. I’ll briefly discuss the results of these tests below.
Building Levels with Unity Terrain Objects

Unity provides builtin support for creating terrain. This tool provides a flat surface and a set of tools that allow you to “paint” the terrain with the mouse. These tools allow you to raise terrain, lower terrain, set a fixed height, smooth terrain, and more. In order to create the precise geometric maps I was going for, I attempted to configure these tools to create a very low-resolution terrain mesh. The above image shows a map created with a square brush of size 3 and the minimum heightmap resolution I could set (33×33). While this tool would clearly be useful for creating landscapes, in the end it felt too “organic” for the style I was trying to create. Additional, I found it very difficult to use the terrain paint tools to create tile-perfect shapes instead of more “artistic” changes in elevation.
Building Levels with ProBuilder

Unity provides a package called ProBuilder, which is a sort of cross between a level design tool and a general purpose 3D modelling program. This package augments the builtin 3D shapes (cube, sphere, etc.) with the ability to perform more complex operations such as face extrusion, creation of edge loops, etc. This would let me create geometric shapes for the various tiles in my maps, but allows me to use a smaller number of more complex shapes instead of having a single cube for every single map tile. In addition to being simpler to create, this should result in much higher performance given the significant reduction in the number of vertices.
Based on the prototyping done over the last couple of days, I have decided I will be using ProBuilder to build the levels in High Roller. The screenshot above shows a near-recreation of the starting area from the first level of Marble Madness, modeled with ProBuilder.